
LEFT: Hokkaido Pumpkin in Italy CENTER: Day 4 of planting LEFT: Day 120 after planting
This is my very delayed post on how we grow our first Hokkaido pumpkins in a container in Riyadh. I have to tell you that the whole experience was so captivating and enchanting. Sometimes it’s easy to forget how wonderful nature is. But looking back at these images means we can’t forget how exciting each day was during the growing period…when the first thing we used to do in the morning was run outside to see how many new leaves there are or patiently wait for the flowers to arrive.
A friend once said, “A life of simplicity means the world to me,” as he quit his 7-figure salary with a 9-figure research budget to become a physics teacher in a deprived area of London. I thought he was crazy! Who knew it would take a decade and growing Hokkaido pumpkins to finally understand what this truly means!
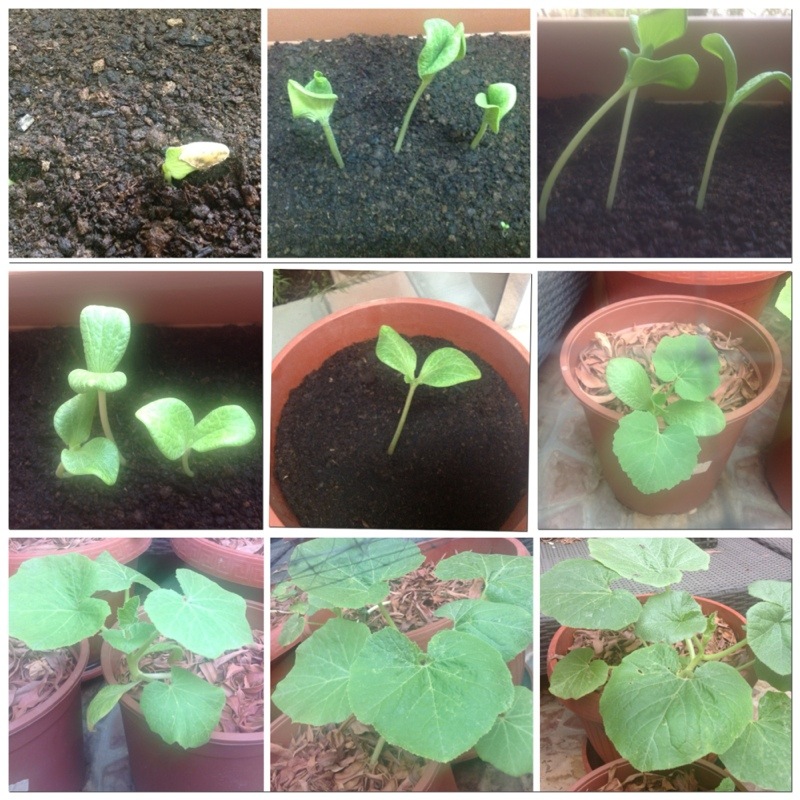
In the picture above, you’ll notice we started off with three sprouts. We started with three because it’s a very auspicious number and also if one or two sprouts die, at least we’ll be left with one sprout.
We soaked the pumpkin seeds, which are a variety grown in our Italian farm, for three days to begin the germination process. We prepared a container with organic potting soil and compost, and watered this daily with about 500ml of water. The soil was an impulse buy from Lulu (of all random places lol) but Sultan Garden Center or Saco should have good soil too. The container should be long – at least 120cm long and should have good drainage. (Containers are sold by how many liters they hold but as I don’t have the container in front of me now, I don’t know how many liters our one holds. I do know it’s about 140cm x 50cm.) Our container cost 400SAR and was from the Sultan Garden Center. After three days, we planted the seeds about a 5cm deep. Within a couple of days, the sprouts were shooting up.
When the third leaf was about to come out, we had to transplant the shoots into separate pots. To minimize the amount of transplanting, always plant one sprout into one container. Also, as pumpkins need full sun, the container should be placed in direct sunlight or the part of your garden that receives the most sun.
To retain the moisture in the soil, and minimize the watering, we covered the top layer with leaves that had fallen from the trees in our garden. You can use hay to mulch too. As a guideline, if your soil is dense (mainly potting soil), then you need to water less than if your soil is sandy. To check if your pumpkin is ready for watering, dig an inch into the soil with your finger. If the soil is dry, then it’s time to water. We watered in the early morning just before sunrise. When watering, slowly water the base of the plant and not the leaves. Water until there’s a puddle at the top.

The leaves just got bigger and bigger, and every time we admired our little plant, we found it to be very therapeutic.
We fertilized our pumpkins once with an organic liquid fertilizer. Pumpkin fertilizers should be low in nitrogen and high in phosphate and potassium. 5-15-15 or 8-24-24 fertilizer ratios work best. If you use a fertilizer with too much nitrogen, your pumpkin plants will become very large but won’t produce any fruit. Nitrogen rich fertilizers will also attract aphids. It’s recommended that you fertilize once a month for small plants and only until the flowers arrive.

The leaves stand upright in the night
The above picture is about 5 weeks in. The plant was growing 30cm a day! We spent one hour watching the plant grow in the night and measured it every 15mins. In once hour, it grew 1cm. We also noticed something else – that during the night the leaves would stand up, especially when it got closer to the full moon. We have a lot of trees and plants in our garden, but it was only when we started growing our pumpkin plant that we noticed this phenomenon.

Flowers
Now comes the most exciting part – the flowers. I remember we used to look at the plant from every angle to see if the flowers arrived. We even delayed our trip to Germany because we wanted to see the flowers. The male flowers arrive about a week before the female flowers arrive. You can tell the difference between the two, as the female flowers will have a small round pumpkin at the bottom, as shown in the pic above. (Unfortunately, I don’t have the flower images of the container pumpkin and so used the images from our second round of pumpkin growing)
In order for the pumpkin to grow, the female flower needs to be pollinated. We were very fortunate to have beehives in our garden. As soon as the flowers appeared the bees were buzzing all over the plant and fertilized it. You can fertilize the pumpkin yourself by swirling a cotton bud in a male flower to pick up the pollen and then swirling the pollen in the female flower. What’s fascinating about the flowers is they open as the sun rises and then after midday they start to close again. Although Hokkaido pumpkin yields vary, expect to get about 7 -10 pumpkins per plant.

When the female flowers are pollinated, the small pumpkin will start growing. At first you might not see it growing bigger, but it is still growing. We measured our pumpkins daily, and they used to alternate between growing taller and wider each day. One day it would grow an inch wider and the next day it would grow an inch taller. Eventually it will stop growing and start to ripen. The color will turn from a light orange to a dark orange. You can test when your Hokkaido pumpkin is ready by lightly knocking on the skin. If it sounds hollow, then the pumpkin is ripe and ready to be picked. Another way to check is to see if the stem above the pumpkin is turning hard. If it is turning hard, then your pumpkin is ready to pick.

When your pumpkin has stopped growing, you should leave it out in the sun for a further two weeks. This allows the skin to harden and kills of any other organisms that cause it to rot. Then, take a sharp knife and leaving the stem intact, cut away the stem from the main pumpkin plant.

Orange flesh ✔ Fully formed seeds ✔ Ready to be steamed? Absolutely! 🙂
The Hokkaido pumpkins last a super long time. We waited three months after harvest to cut one open. You can store the pumpkin at room temperature in a cool and dark place. To make it last even longer, you can refrigerate it. Some pumpkins growers rub the pumpkin skin with 10% bleach solution to preserve the pumpkin before they store it. We didn’t do this so I am not sure how much longer your pumpkin lasts by doing this. We enjoyed our pumpkins nearly 6 months after harvest and still there was no rotting or drying.
Now congratulate yourself for growing your own pumpkin! It’s an achievement that not many people can say they’ve done.

